
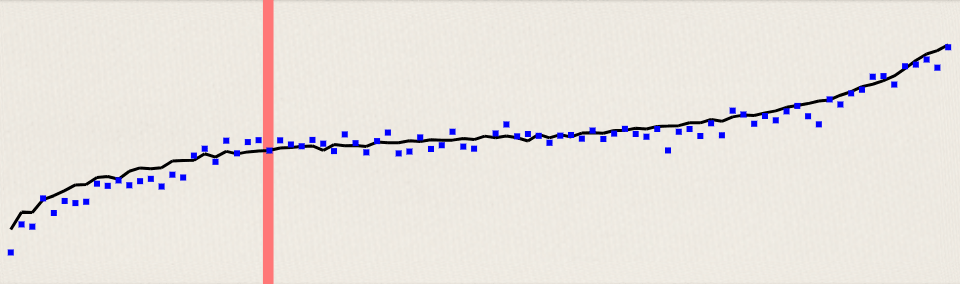
The primary graph plots the tuning curve or “Railsback curve” that shows the degree to which the tuning is stretched from pure octave equal temperament (which would be a flat horizontal line through the middle of the graph). However inharmonicity requires that we “stretch” the tuning of octaves slightly, resulting in the lower registers of the piano being tuned slightly flat and the upper registers being tuned slightly sharp. Whenever a note is played, its pitch is plotted on the graph as a dot, allowing the user to see at a glance to see what the entire tuning looks like. For a perfectly in-tune piano, the dots will all fall exactly on tuning curve line. The vertical scale on the tuning curve graph goes from −50 to +50 cents.
Instructions & Support
Table of Contents:
Getting started
Quick start steps for tuning a piano:
- Create a new tuning file (Menu > New tuning file). Name it or select temperament/pitch settings if desired, then press “Continue”.
- Sample inharmonicity to create a tuning curve. Play several notes across the range of the piano, playing each note for at least 1 second. It is especially important to sample notes in the mid-section, tenor, and low bass. PianoMeter is always listening and will automatically calculate an ideal tuning curve based on the inharmonicity of the sampled notes. Note: if the unisons are significantly out of tune you may get faster results by using mutes to isolate and sample single strings.
- Rough tuning (optional): If the piano is more than about 10 cents sharp or flat you should do a rough tuning (“pitch correction” or “pitch raise”). Even if the piano is within ±3 cents of standard pitch it is still advisable to run through the notes quickly and fix any outliers, as this will result in a better fine tuning. The benefit of doing this pre-tuning pass is that the app will gather more inharmonicity data and further refine the tuning curve. If you skip this step you might consider quickly sampling inharmonicity for all the notes on the piano (except the top octave) which can be done in about 1 minute.
- Lock the tuning curve using the “ear” button on the right side of the screen.
 This stops future inharmonicity measurements and prevents the tuning curve from changing during a fine tuning.
 - Fine tune the piano. The recommended order is to tune the midsection first, starting at the tenor break (often around D#3), tune up through the treble, and then tune the bass last.
Tuning display
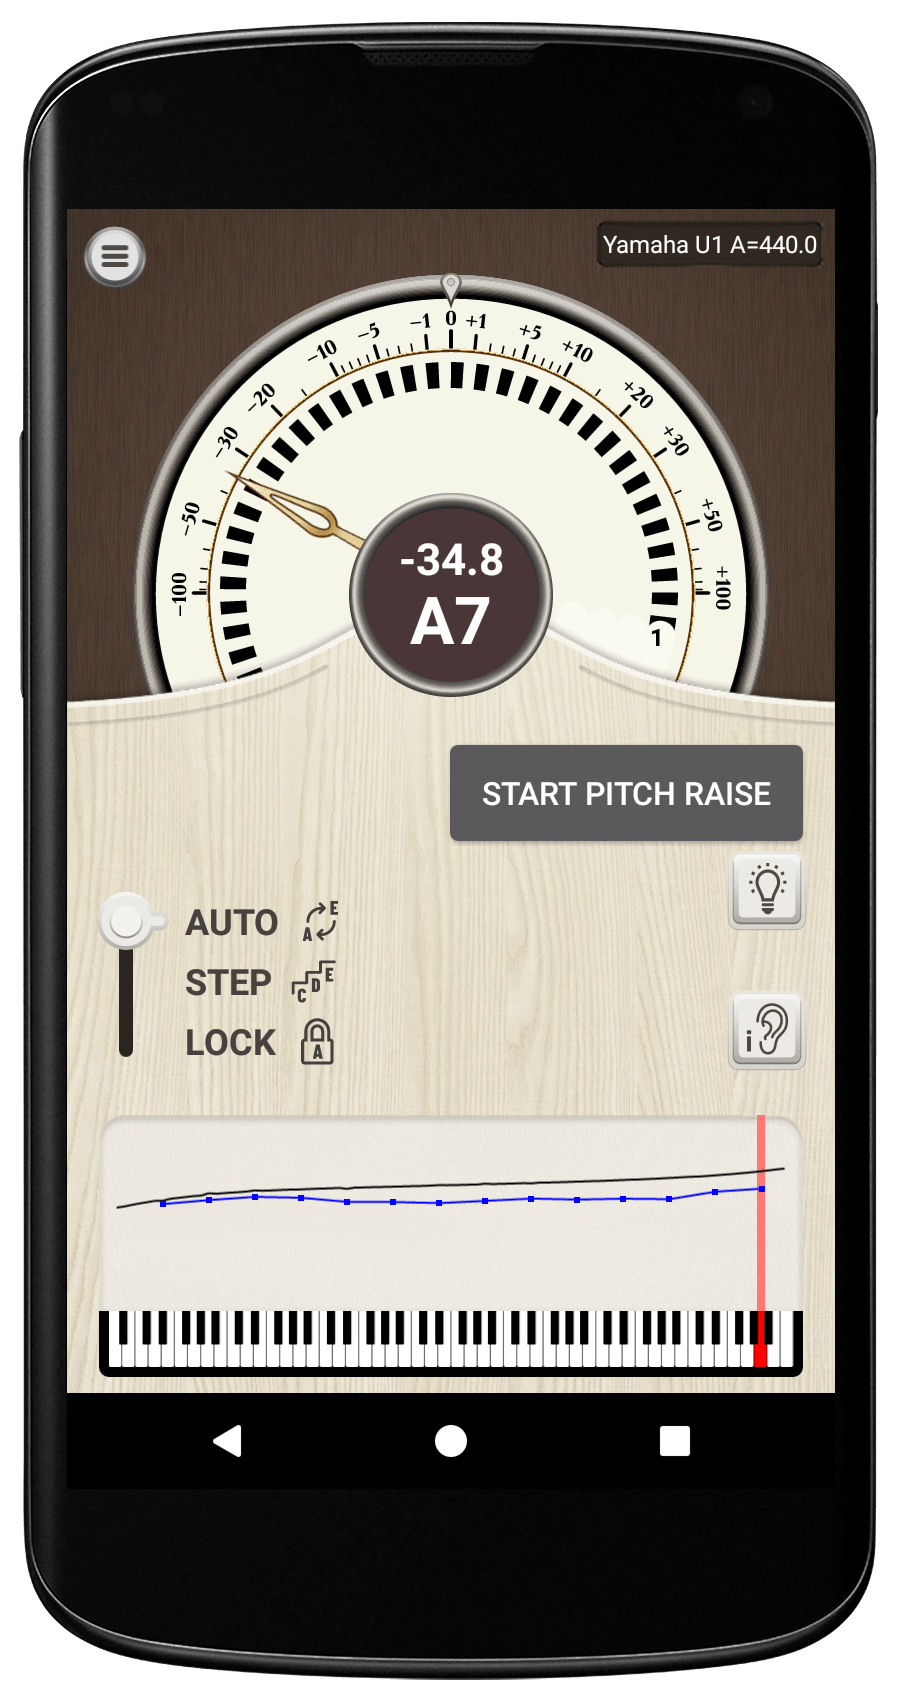
There are multiple ways to see whether a note is sharp or flat. The text in the center of the screen displays the note being played and how many “cents” sharp or flat it is. Surrounding the center circle are a series of spinning bars, similar to a stroboscopic tuner’s phase display, whose direction and speed indicate how out of tune a note is. Clockwise spinning means the note is sharp, while counter-clockwise indicates the note is flat.
Each set of spinning bars represents a specific harmonic of the note being played, and small numbers in the lower right indicate which harmonics are being measured. If a harmonic is not present in the tone, the corresponding spinner will not be displayed. Finally there is a pointer with a non-linear scale that indicates how sharp or flat the note is, again in cents. (A cent equals a hundredth of a half step.) The dial and numbers are less accurate and slower to respond to changes in pitch than the spinning strobe display, so it is best to use the strobe for fine tuning.
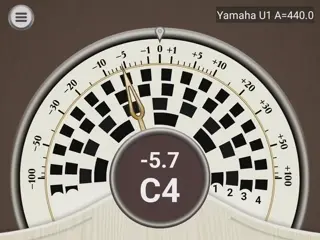
This note is 5.5 cents flat

This note is exactly in tune
Graphing area
There are 3 possible displays in the graphing area that can be accessed by swiping left or right or tapping on the left or right sides of the graph.
Tuning Curve
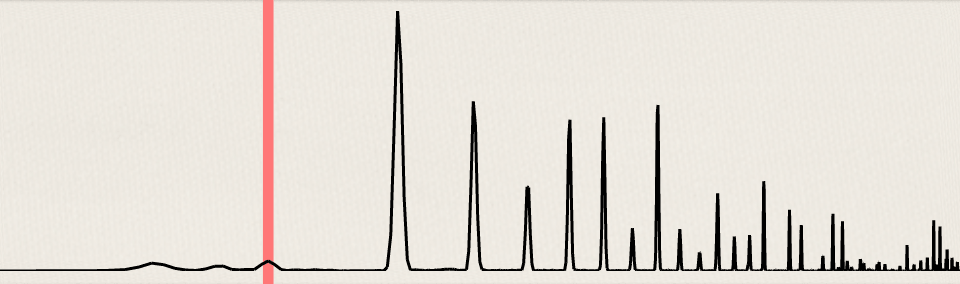
Frequency Spectrum
Inharmonicity
Peak view
Note switching modes
There are 3 note switching modes available through a selector on the main screen.

Automatic note switching allows the app to detect and jump to any note played anywhere on the keyboard.

Stepwise note switching allows the note to step up and down chromatically, but prevents longer range jumps. This mode will prevent “octave jumping” that sometimes occurs while a note is sustained, or random jumps due to background or action noise.

Lock mode prevents all automatic switching, locking to the current note.
Manual note switching
At any time you can manually switch what note the app is listening to by using hidden touch areas to the left and right of the center note display.
- To change the note up or down by a half step, tap the hidden buttons to the right or left of the center circle.
- To change the note up or down an octave, swipe right or left starting from the center circle. Swiping right will jump up an octave, swiping left will jump down an octave.
You can also jump to any note on the piano by touching that note on the small keyboard at the bottom of the screen.

Locking a tuning
By default, whenever the app is running it will be listening for and measuring the inharmonicity of each note. As new information is acquired it repeatedly recalculates the tuning in order to give you the best tuning based on all available data. Generally the changes in tuning are quite small after the initial inharmonicity measurements of several notes across the range of the piano. However, it may be desirable to at some point “lock” a tuning to protect it from any future changes. This is done by toggling the button on the right side of the screen from ![]() “Listen” mode to
“Listen” mode to ![]() “Lock” mode. A good time to do this might be after a pitch adjustment, when the inharmonicity of most notes has been measured.
“Lock” mode. A good time to do this might be after a pitch adjustment, when the inharmonicity of most notes has been measured.
Saving and loading tuning files
In the Pro version of PianoMeter it is possible to save the tuning files that contain the inharmonicity data and tuning curve for pianos. The tuning files can then be loaded at a later date to re-tune the same piano. Although tuning files are saved automatically, you can input a name and/or identifying information for each file. This is done via Menu > Tuning file settings. There, you can enter information about the manufacturer, model, serial number, type of piano, and the name of the piano’s owner (for professional tuners with multiple clients) and other miscellaneous information about the piano. This information is for piano identification only and does not affect the tuning curve.
To load a previously saved tuning file, select Menu > Load tuning file, and then simply select the tuning file you wish to load. Saved tuning files can be sorted by name, manufacturer, and date accessed; you can also locate tuning files using the search bar at the top of the screen. Long-pressing a tuning file brings up a special menu with options to copy, rename, delete, or “share” a tuning file (exporting it to email, messaging, dropbox, etc.)
Calibration
The clock chips in modern devices are accurate enough that calibrating PianoMeter is almost never necessary. However you can calibrate the PianoMeter to an external reference by accessing the calibration page from the main menu. To calibrate, first enter the calibration source frequency in the box, then while playing the calibration tone, toggle the calibration offset until the spinner stops. This calibration will then be saved until the app is uninstalled from your device.
Attempting to check PianoMeter’s calibration from the main tuning screen instead of inside the Calibration page will often lead to inaccurate results. The reason for this is the A=440 tones generated by electronic metronomes/tuners and other electronic sources will often show up as “flat” on PianoMeter’s display, because there PianoMeter is listening for multiple harmonics (not just 440 Hz) and is expecting those harmonics to have significant inharmonicity, while the harmonics from the electronically generated tone don’t have inharmonicity.
Tuning to frequencies other than A=440
By default tunings are calculated around the international A=440 Hz pitch standard. If you wish to tune to a frequency other than A=440, this is possible via the Tuning file settings page, where you can set an alternate frequency standard (eg. A=415 or A=442) or an offset in cents from A=440. Changing this only affects the current tuning.
If you wish to set an alternate default pitch standard for all new tuning files, this can be done from Menu > General settings > Global pitch offset.
Unequal Temperaments
PianoMeter comes with several unequal/historical temperaments pre-loaded, and if you have a preferred temperament that isn’t included, you can add it as a custom temperament using the offsets from a site like rollingball.com.
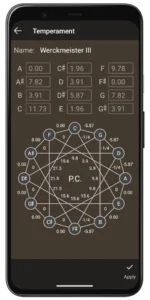
To choose a temperament for the current tuning, first go to the tuning file settings (Menu > Tuning file settings) and then click on “Temperament”. Select your preferred temperament, then click “Apply”.
Each temperament has a detail page with a circle of fifths illustration showing how wide or narrow each Fifth and Major Third is. (In equal temperament, thirds are 13.7 cents wide, and fifths are 1.96 cents , or 1/12 of a comma, narrow.)
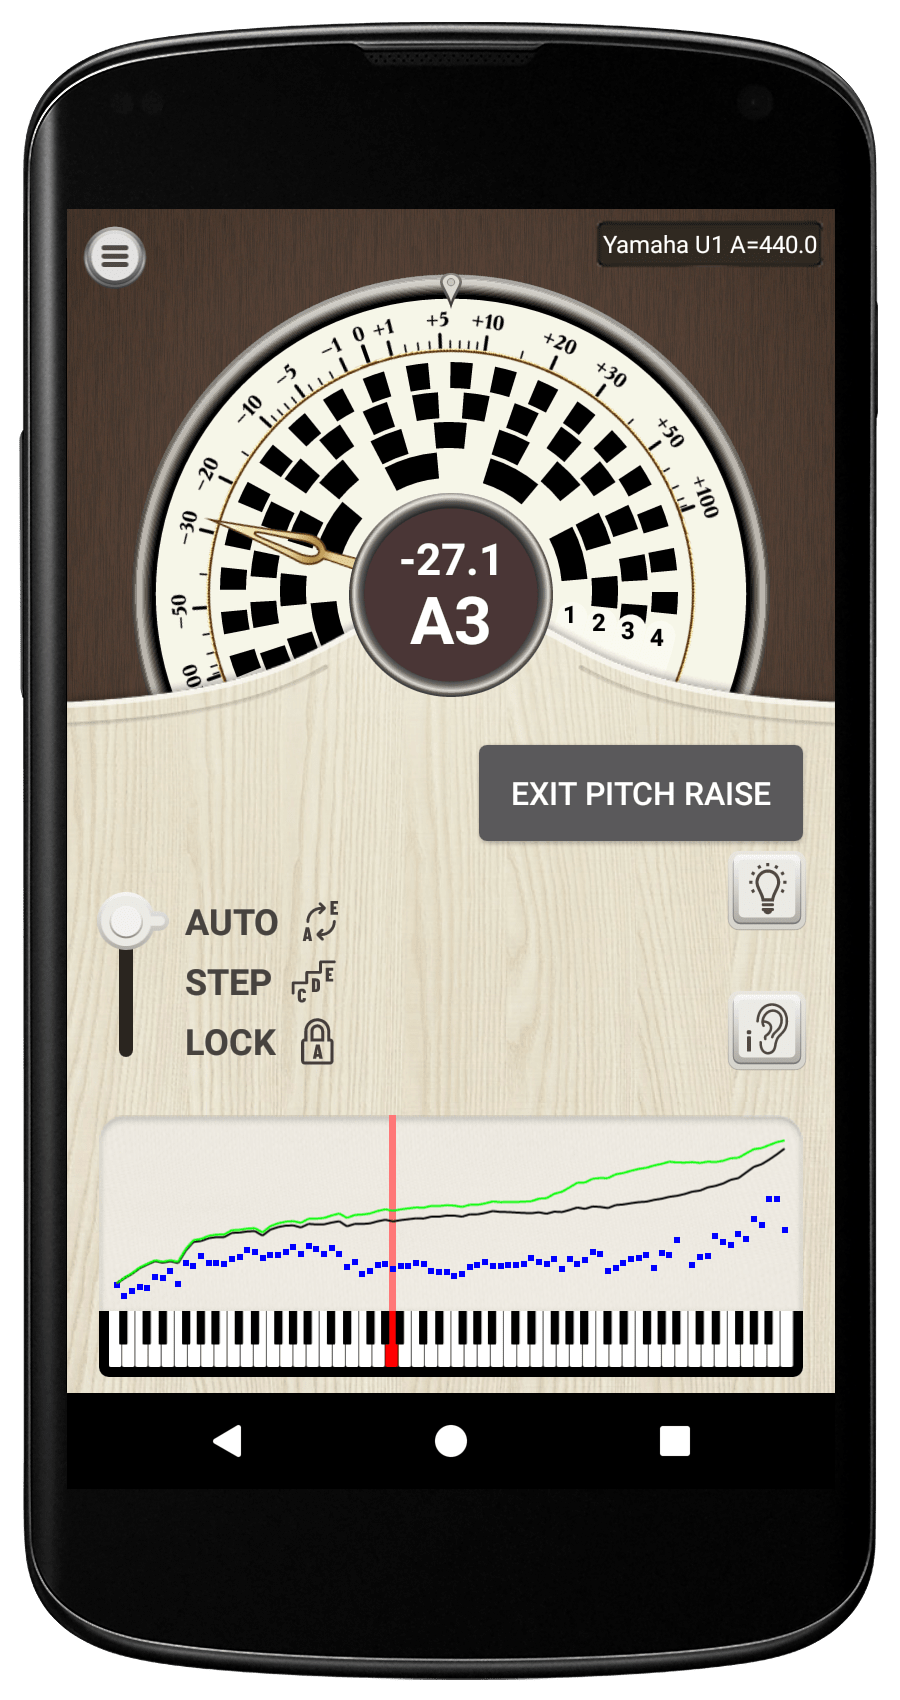
Pitch raises
A Pitch Raise (pro version only) is a rough pre-tuning for pianos that are very out of tune and need to be tuned in two passes. In a pitch raise you tune the piano slightly above pitch (overpull) so when the large increase in string tension makes the piano go flat again it will be roughly in tune. To begin a pitch raise, open the Pitch Raise dialogue from the main menu, then select the type of piano you are tuning. (The overpull profile is slightly different on grands vs. uprights.)
Next select the lowest unwound (plain wire) string, and the highest string in the mid-section.
Finally select up to 3 notes per octave to pre-measure for calculating the pitch raise overpull. These notes must be at least a minor third (3 half-steps) apart to avoid measuring the wrong note in pianos that are more than 100 cents flat. Two notes per octave (for example A’s and D#s) is sufficient. Press “Continue” and then play each note for every octave on the piano until the corresponding dot in the graphing area stabilizes. It is not necessary to measure all notes in every octave. PianoMeter will interpolate and extrapolate.
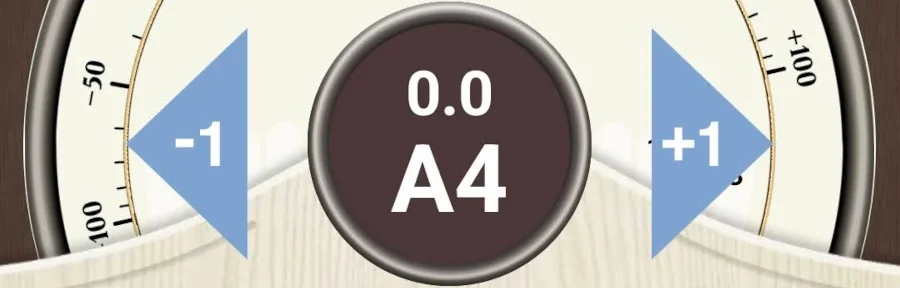
When you are satisfied that the initial pitch for each note is measured accurately, press the “Start Pitch Raise” button. The graphing area at the bottom will now show a black line representing the tuning curve and a green line representing the target overpull. The dial at the top will also rotate for each note to indicate the overpull, and the pitch targets for the strobe rings will be adjusted. When a note is “in tune” the strobe rings will stop and the needle will be pointing directly up (which will generally not be zero). For the tuning order, it is recommended to start tuning at the tenor break (bottom of the mid-section) and tune upward to the top of the piano, then tune the bass strings last, working downward from the tenor break. For example, if the lowest note in the mid-section is D#3, first tune from D#3 to C8, then from D3 to A0. Finally press “Exit Pitch Raise” and fine-tune the piano in a second pass.
Inharmonicity weight factor
At the bottom of the Tuning Style (Interval Weights) page, there is an option to adjust an Inharmonicity weight factor for that style. Decreasing this value will make the tuning curve look smoother, but the tuning targets won’t align as well with the actual spacing of harmonics on poorly scaled pianos. Raising the value will deliver a “spikier” tuning curve that is more customized to an individual piano. Although changing the weight factor doesn’t make a large difference in the actual tuning, it should only be modified by users who know what they’re doing. (Note that as of December 2025, the inharmonicity weight factor is managed through the Tuning Styles page instead of General Settings.)
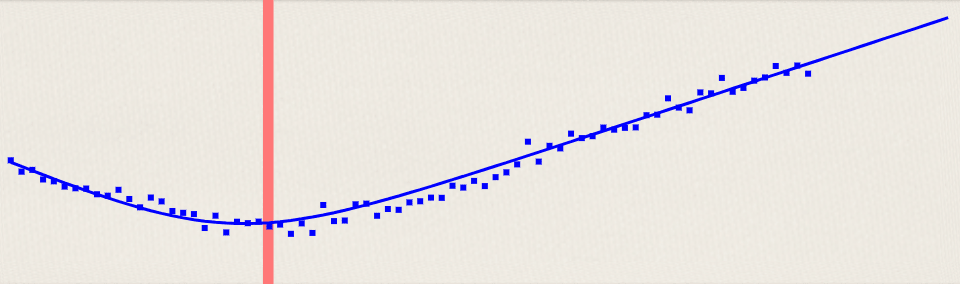
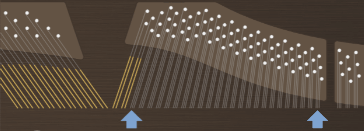
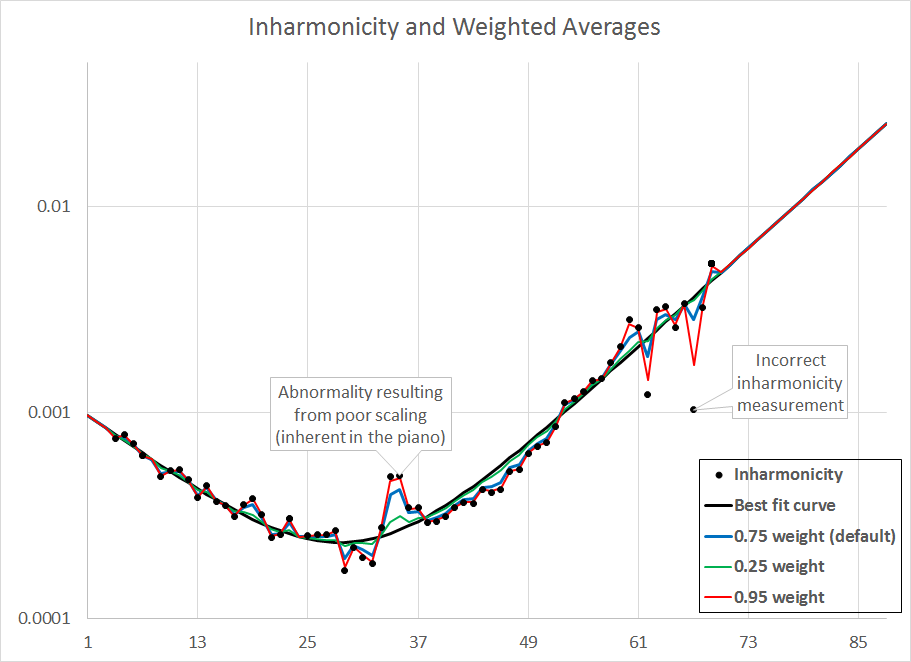
When measuring the inharmonicity of any piano there is always “noise” in the data, meaning that on the inharmonicity graph, the dots representing the inharmonicity of individual notes won’t line up with the “best fit” average curve. Some of this is due to actual properties of the piano’s scale (i.e. the length and thickness of strings for each note) but some of it might be due to errors in measuring the inharmonicity, like the microphone picking up extra noise.
The image below shows actual inharmonicity readings (black dots) from a spinet piano and the best fit curve (black line) that is used for notes whose inharmonicity has not been measured. For notes that have been measured the app uses a weighted average of the measured inharmonicity and the best fit curve. The red, green and blue lines show how modifying the “inharmonicity weight” factor affects the average that is passed into the tuning curve calculations. A high number gives more weight to the actual measured data, while a low number gives more weight to the best fit curve. A high weight factor (red line) will be slightly better at dealing with poorly scaled pianos with large deviations in inharmonicity at the tenor break, however it is also more sensitive to incorrect measurements, so if you choose to raise the weight from its default value you should review the inharmonicity graph for outliers/errors before fine tuning a piano. If you just want a “safe” smooth tuning for the piano that minimizes the effects of jumps in inharmonicity, you can lower the weight factor; however this can sometimes cause a problem where all the strobe wheels won’t completely stop when a note is in tune (some turn right slowly and some turn left slowly). The majority of users will probably be served best by leaving the weight factor at its default value of 0.75.
Note: it is possible to delete bad inharmonicity measurements from the main screen. To do this, swipe to the inharmonicity curve in the graphing area, make sure you are on the note with the bad reading (see “manual note switching” above), and then long-ress in the graphing area. That will bring up a small menu with the option to “delete inharmonicity for current note”.
Tuning Style (Interval weights)
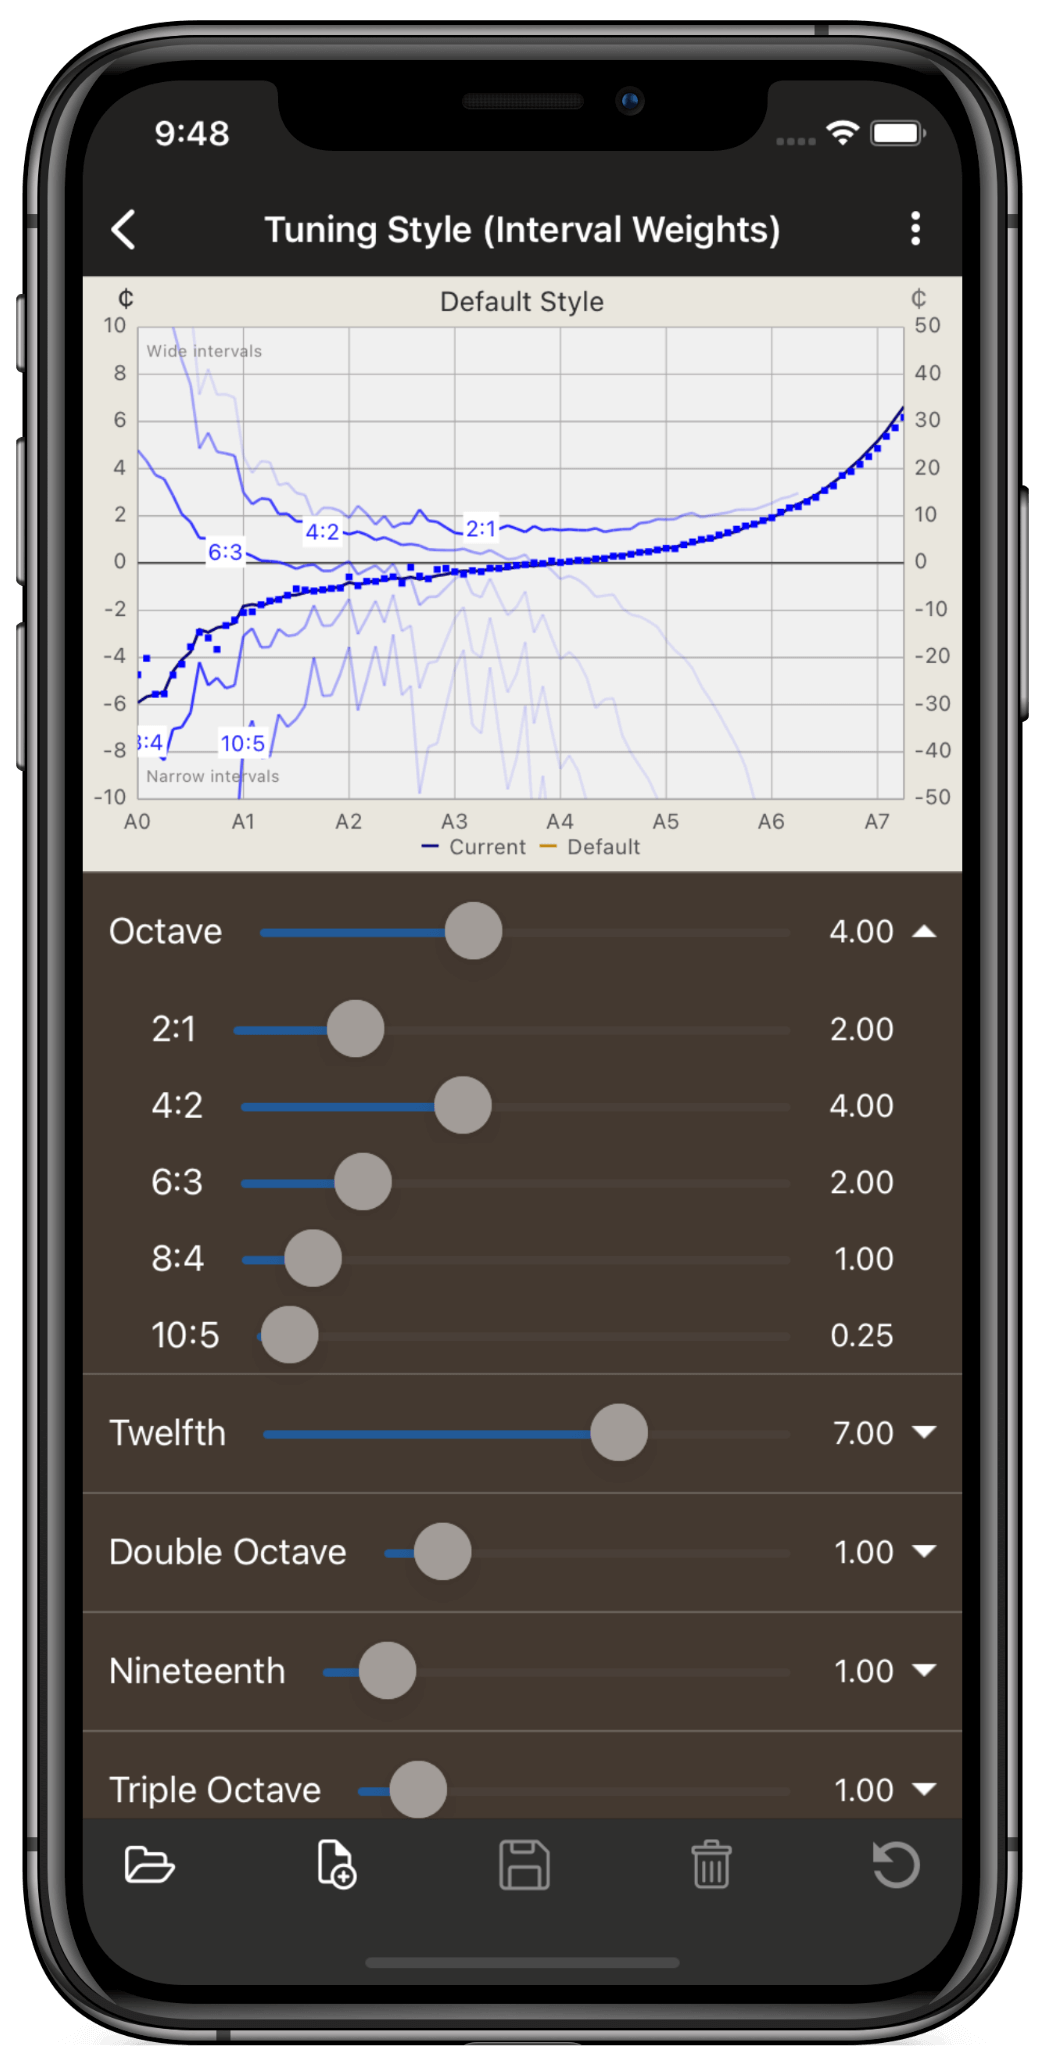
Tuning styles can be customized by adjusting “weights” that are assigned to various slow-beating intervals. Intervals with higher weights will be tuned more pure than intervals with lower weights, but all intervals will be tempered slightly in the tuning calculation.
- Octaves can be used to somewhat control the “stretch” of a tuning. A high 2:1 octave weight lessens the stretch in the treble, and the 10:5 octave weight greatly affects the stretch of the low bass.
- Pure 12ths (5th plus an octave) generally result in a balanced tuning, so by default the 12ths are given a high weight. Pure 3:1 twelfths stretch the treble more than 2:1 octaves, and 9:3 twelfths can be used to add more stretch to the bass.
- 5ths and 4ths are tuned narrow and wide respectively, so adjusting their weights can somewhat alter the overall stretch.
- Double octaves help to balance the piano, and giving weight to 4:1 double octaves results in a higher stretch than pure 2:1 octaves for the treble.
- Triple octaves and 19ths help ensure the piano sounds consonant when large chords are played. Triple octaves affect the stretch throughout the piano, especially in the treble and bass.
- You can also manually add or subtract extra stretch in the treble or bass for a specified number of notes/octaves.
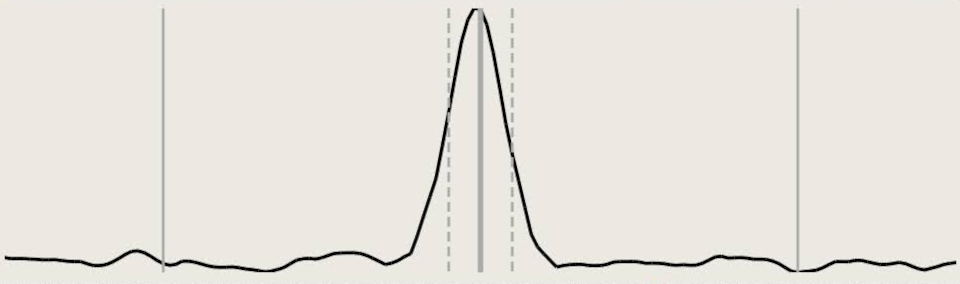
The graph here shows a tuning curve in black, and the width of different octave types in blue for the calculated tuning. A positive value indicates that the interval is tuned wide of pure, and a negative value indicates an interval tuned narrow of pure. For example, the line for the 2:1 octave has a value of approximately +2.0 at “A4”. This means that the 2:1 A4-A5 octave is tuned approximately 2 cents (0.5 beats per second) wide. (The 4:2 A4-A5 octave is tuned very nearly pure.) The varying darkness of the blue lines are a rough indicator of the strength of that interval throughout the range of the piano. For example, the 2:1 octave is strong through the midsection of the piano and into the treble, but is weak in the bass because the fundamental (1st) and 2nd harmonics are absent in the tone of the lowest bass notes. By contrast, the 8:4 and 10:5 octaves are strongest in the tenor and bass regions. The strength of each interval also affects the weight it is given in the final calculation of the tuning curve.

In the December 2025 update, an “Adaptive Bass Stretch” factor was added to all tuning styles. Many aural piano tuners choose to tune large grand pianos with extra stretch in the bass…choosing more exotic intervals to tune pure like 8:4 or 10:5 octaves that give more stretch than the typical “pure 6:3 octave” or “6:2 twelfth” that is seen as a good starting point for the bass section. Likewise, on short scaled pianos like spinets and baby grands, tuners will often use the conservative 6:3 octaves for a “clean” tuning. The Adaptive Bass Stretch in PianoMeter automates this, detecting the size of the piano, and adjusting the weights of bass octaves accordingly.
You can adjust the degree to which Adaptive Bass Stretch affects pianos. A value of 1.0 is default. A value of 0.0 turns the adaptive stretch off entirely. And a value of 2.0 basically doubles the effect.
FAQ
Please visit our Frequently Asked Questions page for answers to frequently asked questions, including dealing with the quirks and annoyances of the Apple and Google app stores.
For hobbyists
Hobbyists or DIYers wanting to tune their own piano can check out our short guide to tuning your own piano using the PianoMeter app. I also recommend pianoworld.com as a great resource for any piano enthusiast.